1.2 Usage#
At this point you should have previously installed Miniforge and Visual Studio Code.
Python environments#
Remember that we use Miniforge to have isolated Python environments for our projects. So let’s start by creating a psy111 environment that is able to run all upcoming exercises (as well as create this entire book). Open a a new terminal/PowerShell window and type:
conda create -n psy111 python==3.11
and confirm the installation with y when prompted to do so. Afterwards, activate the environment by typing
conda activate psy111
You should now see a (psy111) in the terminal, indicating that you have succesfully activated the new environment.
You can then type
pip list
to display a list of all installed Python packages. As our environment is still new, this list is still empty. However, we are now ready to install any kind of Python package. There are three packages which we will need soon (numpy for numerical computations, matplotlib for plotting, and ipykernel for interactive notebooks), so we can install them as follows:
pip install numpy matplotlib ipykernel
If you then again type pip list, you will see that the list of installed packages now includes the NumPy. There are more things you can do with Miniforge, and if needed, you can refer to the conda cheatsheet for more information.
The Python interpeter#
If the psy111 environment is active, you can open the Python interpreter by typing python and then presssing enter. The Python interpeter will start and show you the current Python version, for example:
Python 3.14.0 | packaged by conda-forge | (main, Oct  7 2025, 20:07:29) [GCC 14.3.0] on linux
Type "help", "copyright", "credits" or "license" for more information.
>>>
Simply put, the Python interpreter is the program that executes your Python code. It translates the written code into a form that the computer can understand and then runs it. Inside the interpreter we can write any kind of Python code, like printing a message:
>>> print("Welcome to psy111!")
Welcome to psy111!
While this works for simple commands, it is not really useful for more complicated tasks. These would usually be implemented in self-contained Python scripts or Jupyter notebooks. For now, let us exit the Python interpreter by typing quit() and pressing enter.
Python Scripts#
We have previously used the Python interpreter to run simple Python code. However, you will ususally require a more organized way of running your code. For this, let’s open Visual Studio Code.
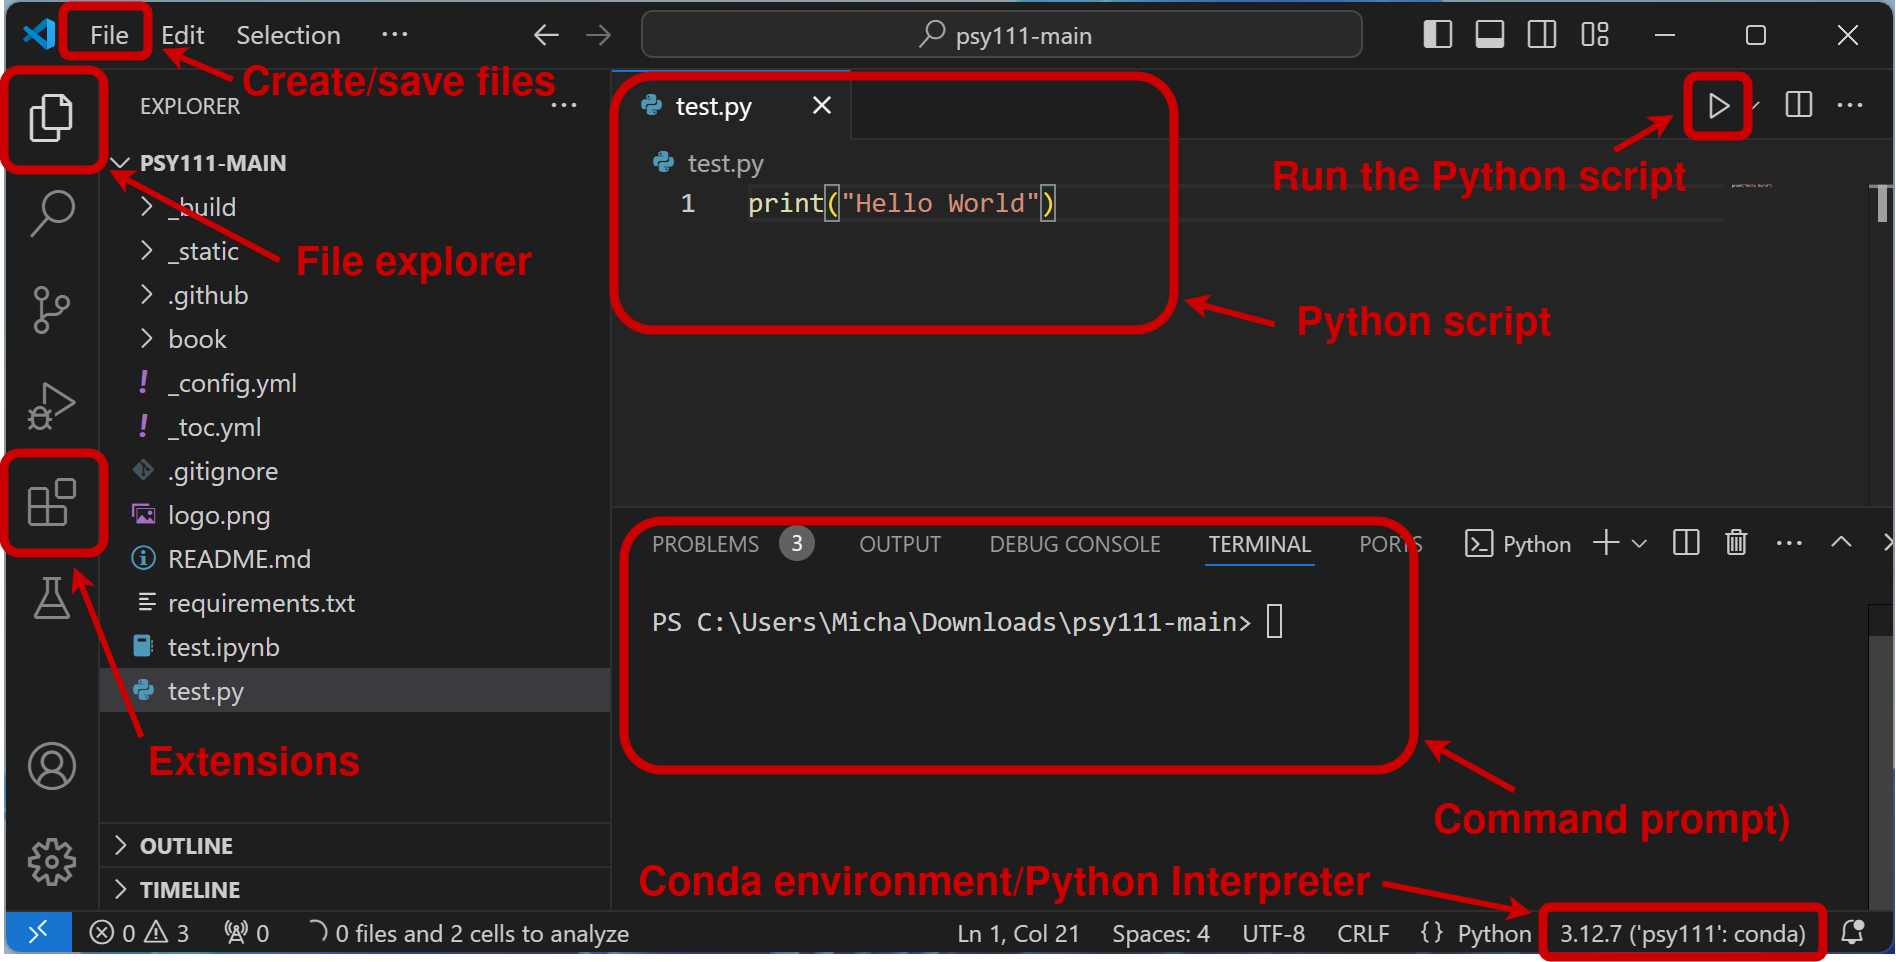
Fig. 2 Visual Studio Code.#
First, navigate to the Extensions button in the left column and install the Python extension.
Next, in the top left click on File → Open Folder… and select (or create) a folder where you want to store your work. After the folder is open in VS Code, click on File → New File… and select Python File. You will see that a new file (for example, Untitled-1) appears inside your opened folder. Save it by clicking File → Save or pressing Ctrl + S (or Command + S on Mac). If you selected “Python File” earlier, the .py extension will be added automatically (you can also add it manually if needed).
You are now ready to write content to your Python script inside this file:
print("Welcome to psy111!")
You can then run the Python script by pressing the run button at the top right. If you do this for the first time, VS Code will most likely promt you to select your Python interpeter at the bottom right. Here, you should now be able to see and select the previously created psy111 enviroment.
Important
When you open only a single Python file in VS Code (without opening a folder), you cannot change or save the Python interpreter in the bottom right corner. VS Code saves the selected interpreter per folder or workspace, not per file. To make the interpreter selection work and stay saved, always open your project folder first with “File → Open Folder…”.
Jupyter notebooks#
Python scripts (like the one you created in the previous section) are single files that run from top to bottom. Sometimes, for example if you have small projects that you would like to share with other, you might want to only have smaller blocks of code with text or images between them. In such cases, you can use Jupyter notebooks. These files contain cells for Python code as well as for text, so you can neatly format and share your code with others. We will also use these noteboks for the exercises in this seminar.
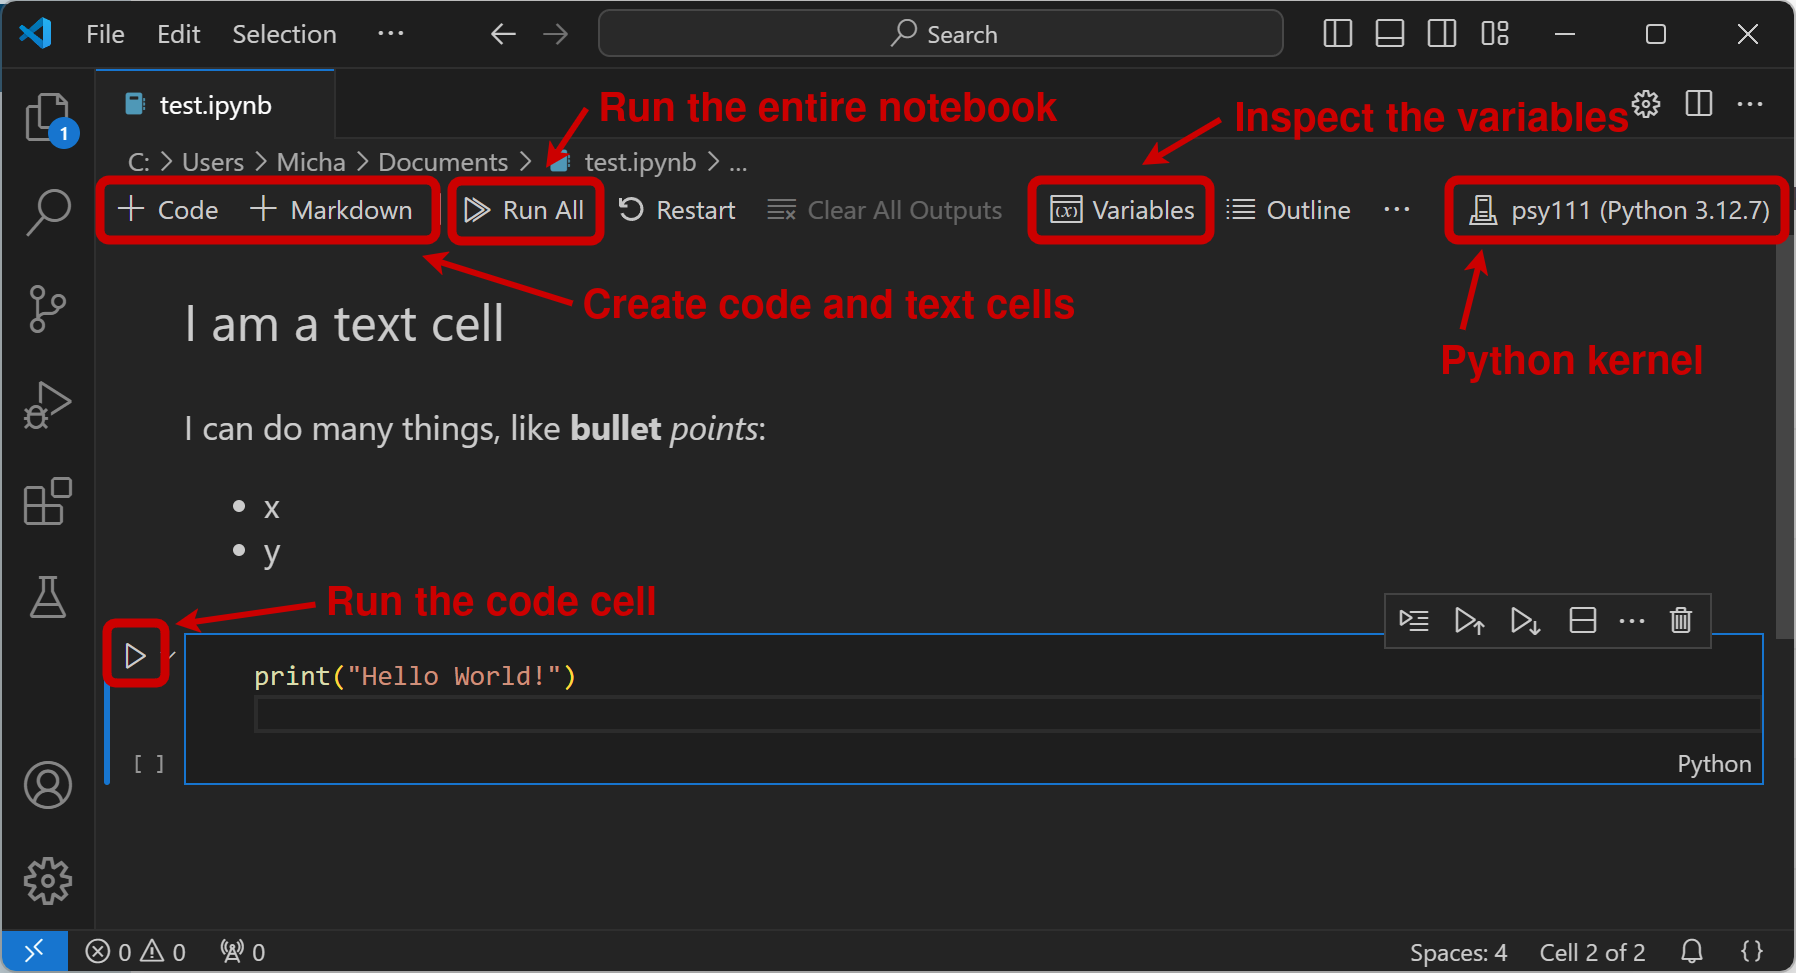
Fig. 3 Jupyter Notebooks.#
To be able to use Jupyter notebooks, you need to install the Juypter extension (just like the previously installed Python extension). You can then create and use .ipynb files, which is short for “interactive python notebook”. Once you created such a notebook, you can add code cells with the + Code and text cells with the + Markdown buttons. The Python interpreter can again be selected from the psy111 environment by pressing the “Select Kernel” button at the top right of the script.
Code cells#
Code cells can have any kind of Python code as an input. They will further also automatically print the last line:
a = 1
b = 2
a + b
3
Markdown cells#
Markdown is a way of writing and formatting text. In fact, all the text in this book is written in Markdown (or to be more specific with MyST Markdown, which is an extension to Markdown). As a start, you can use the cheatsheet to learn about the basic syntax. You will be able to explore this in the upcoming exercises.
The psy111 book#
To be able to use the book on your local computer, you first need to download its source code from GitHub by clicking on the green button and selecting “Download ZIP” (f you are familiar with Git, you can also clone the repository for easier updating in the future). Then, navigate to your Downloads, extract the psy111 folder.
File management
It is strongly recommend that you create and maintain an organized folder structure for your Master’s course, and not keep everything unorganized in your Downloads folder!
Once you have saved and unpacked the psy111 folder, you can open it in VS Code. You can do so by right clicking in the folder and selecting “Open with Code” if you have previously checked the corresponding box in the installation process, or by clicking “File” -> “Open Folder” inside VS Code.
In the file overview on the left you should see a requirements.txt file. If you open it, you can see the necessary Python libraries that are needed for the book. You can install them by either manually typing them into a terminal, or by navigating into the folder of the book with the cd (change directory) command and then installing from the requirements file itself:
cd path/to/your/book
pip install -r requirements.txt
You can then simply type
jb build .
to build the entire book on your computer. Once the build is finished, a link will show up in the terminal, which you paste into your browser to open the book (or you can just open the _build/html/index.html file manually). You can then modify the book in any way you like and rebuild it to show the changes.
You can also use the exercises locally by simply opening the .ipynb files from the relevant folders whithin the book/ folder in VS Code. However, you can can also open them in Google Colab by opening them from whithin the book and clicking on the rocket symbol.
Summary
You can use Python in different ways:
Through standard Python scripts (
.pyfiles)Through interactive Jupyter Notebooks (
.ipynbfiles)
You can use Minforge/Conda to manage your Python environments. You can:
Create environments with
conda create -n <env_name> pythonSwitch environments with
conda activate <env_name>Install packages using
pip installinside the environment